AVS HOL LAB3 – Initial NSX-T configuration
Create DHCP Server from Azure portal
You will create a DHCP server or relay directly from the Azure VMware Solution blade in the Azure portal. The DHCP server or relay connects to the Tier-1 gateway, which gets created when you deploy Azure VMware Solution. All the segments where you gave DHCP ranges will be part of this DHCP. After you’ve created a DHCP server or DHCP relay, you must define a subnet or range on segment level to consume it.
-
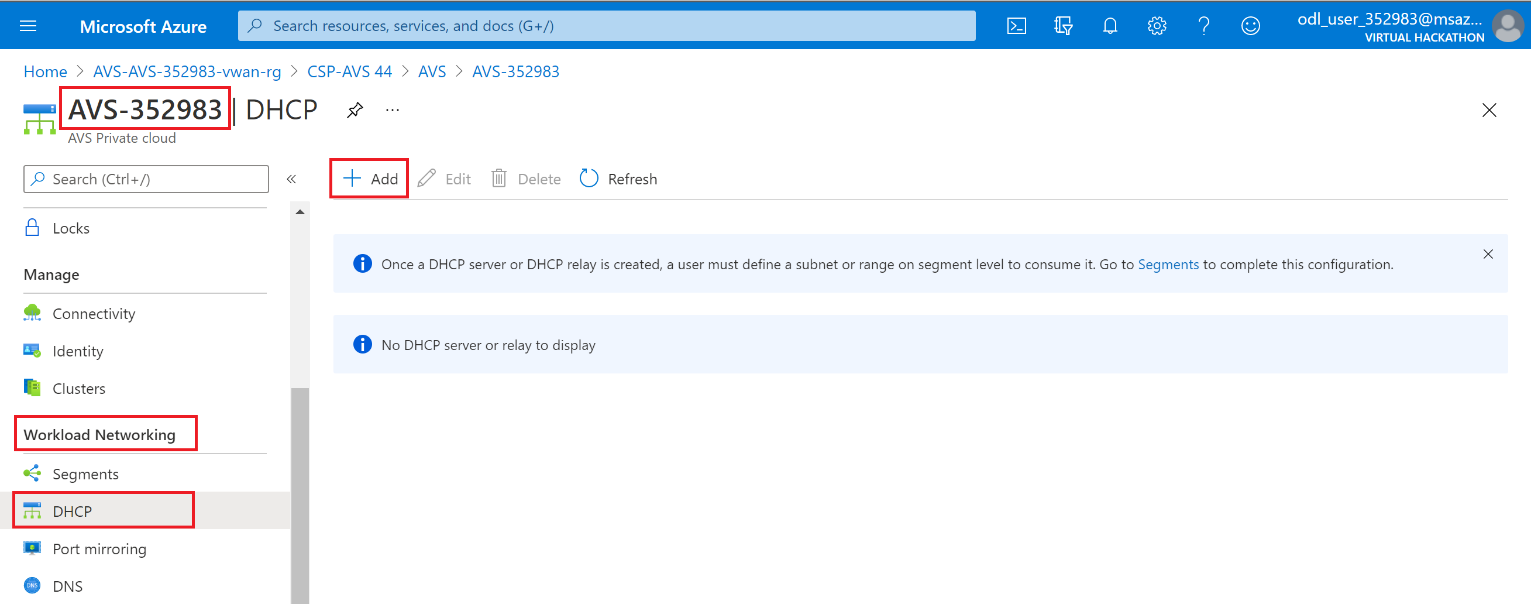
In your Azure VMware Solution Private Cloud, under Workload Networking, select DHCP > Add.
-
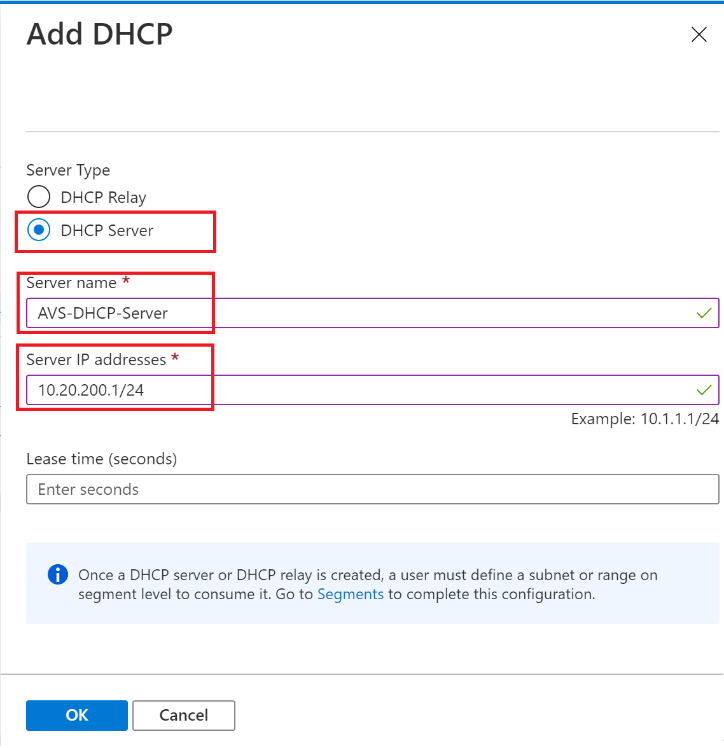
You can select either DHCP Server or DHCP Relay, but in this lab, you’ll need to choose DHCP Server and then provide a name for the server IP addresses, for example 10.20.200.1/24. Next, click on OK.
-
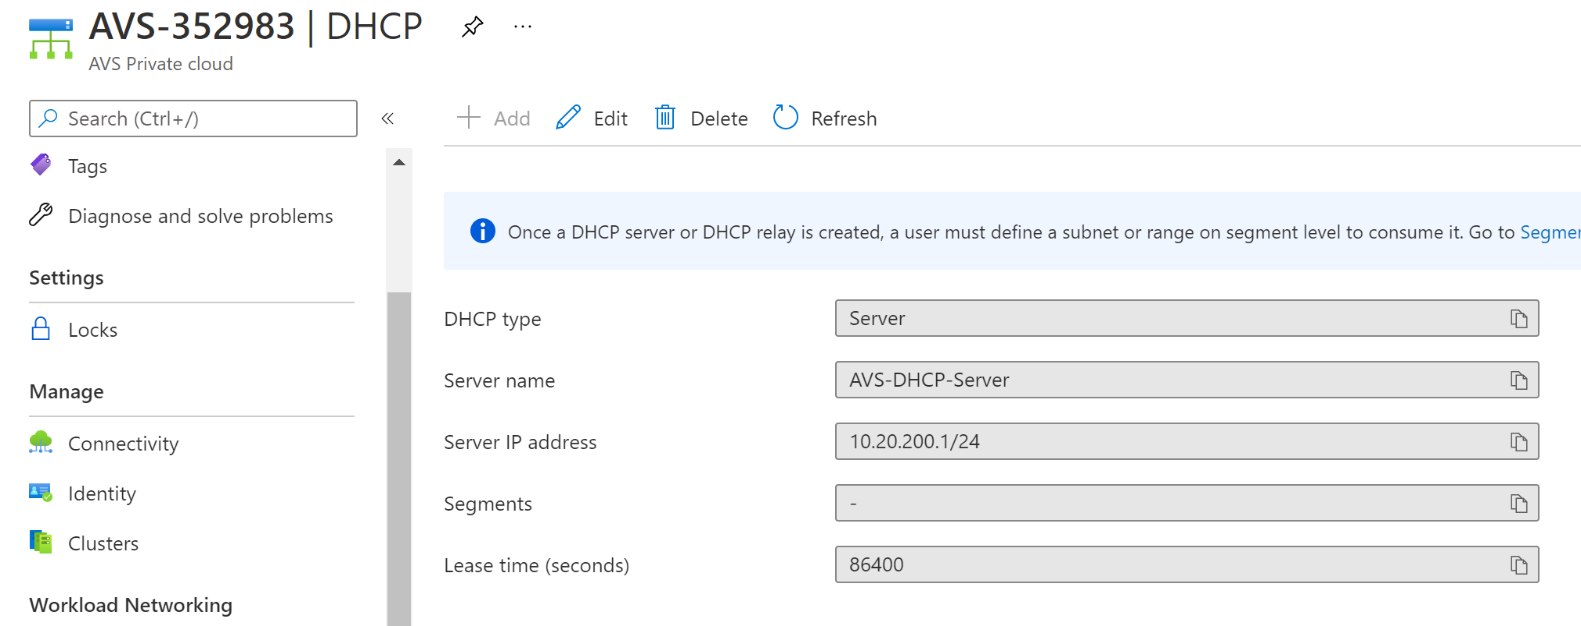
It takes few seconds to complete, after that you’ll see the configuration as in the screenshot below.

Create NSX network segment from Azure portal
You will create and configure an NSX-T segment from the Azure VMware Solution blade in the Azure portal. These segments are connected to the default Tier-1 gateway, and the workloads on these segments get East-West and North-South connectivity. Once you create the segment, it displays in NSX-T Manager and vCenter.
-
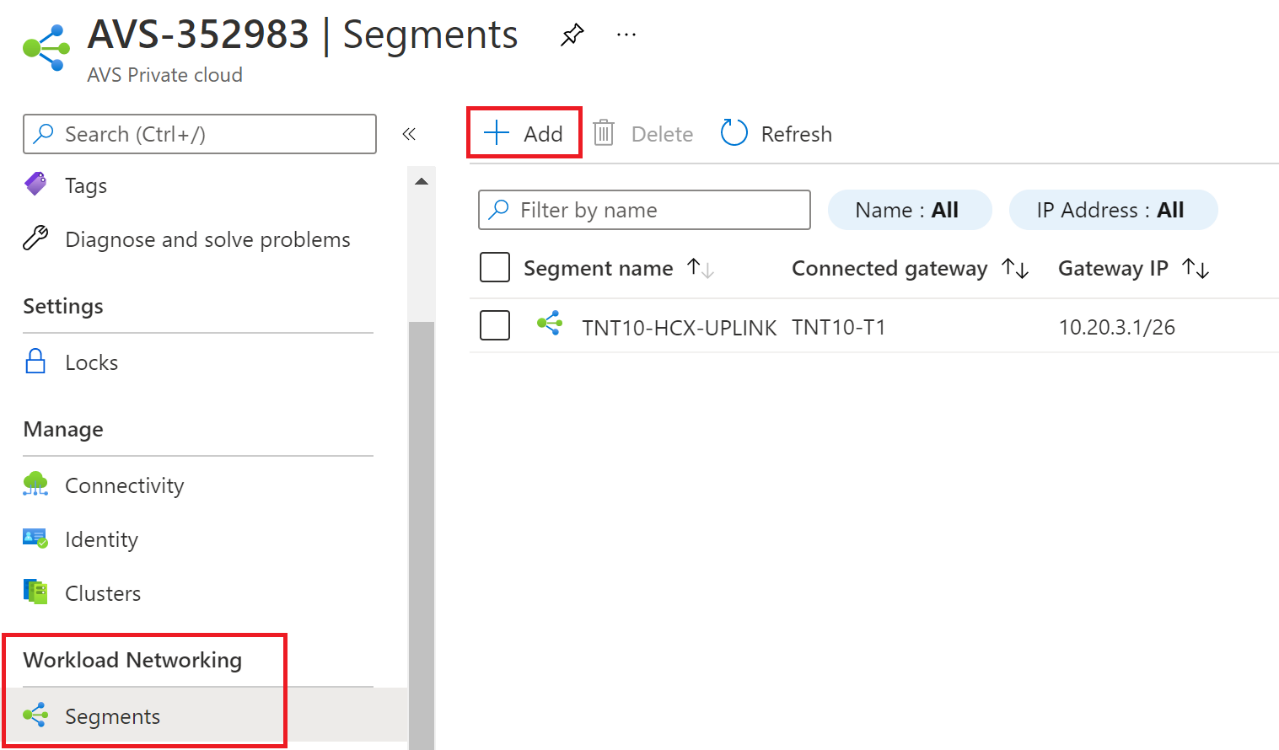
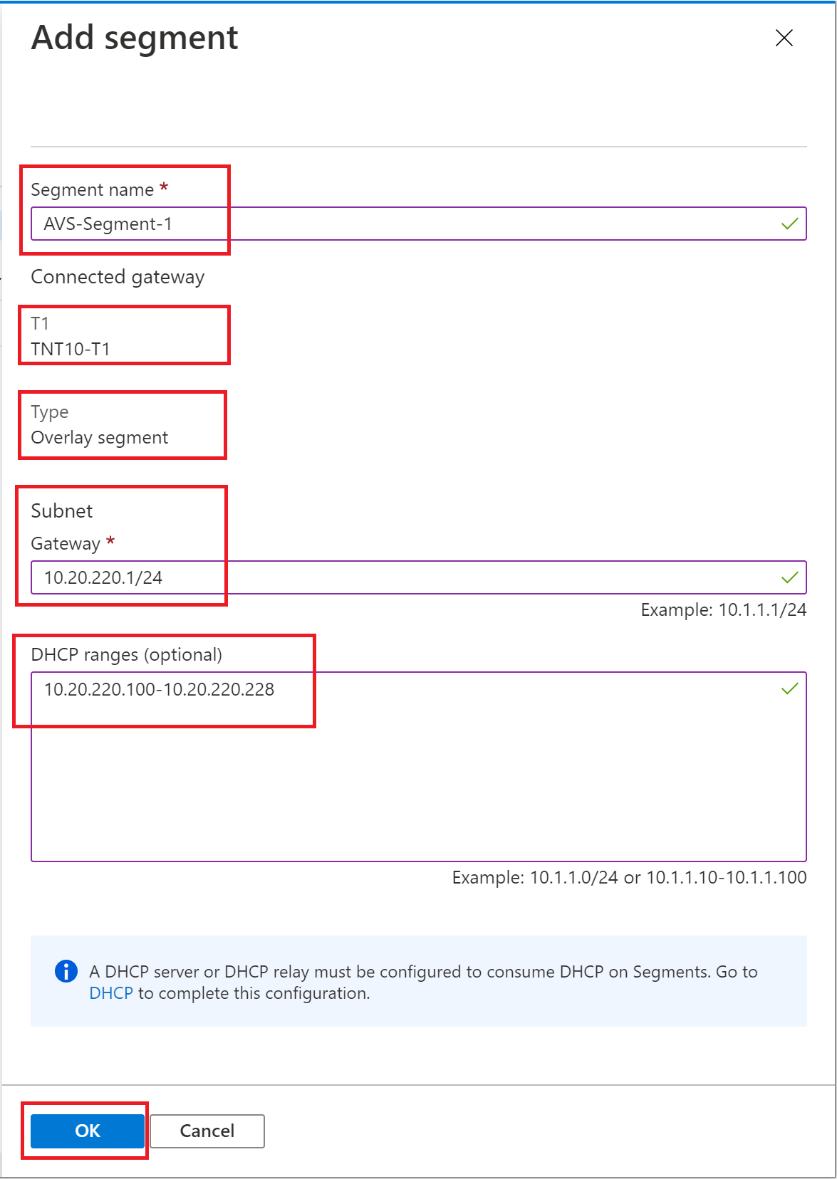
In the Azure VMware Solution Private Cloud, under Workload Networking, select Segments > Add. Provide the details for the new logical segment and select OK.
-
Provide the details for the new logical segment and select OK.
-
Segment name - Name of the logical switch that is visible in vCenter, i.e., AVS-Segment-1
-
Subnet gateway - Gateway IP address for the logical switch’s subnet with a subnet mask. VMs are attached to a logical switch, and all VMs connecting to this switch belong to the same subnet. Also, all VMs attached to this logical segment must carry an IP address from the same segment.
-
Connected gateway - Selected by default and read only. Tier-1 gateway and type of segment information.
-
T1 - Name of the Tier-1 gateway in NSX-T Manager. An Azure VMware Solution Private Cloud comes with an NSX-T Tier-0 gateway in Active/Active mode and a default NSX-T Tier-1 gateway in Active/Standby mode. Segments created through the Azure VMware Solution blade only connect to the default Tier-1 gateway, and the workloads of these segments get East-West and North-South connectivity. You can only create more Tier-1 gateways through NSX-T Manager. Tier-1 gateways created from the NSX-T Manager portal are not visible in the Azure VMware Solution blade.
-
Type - Overlay segment supported by Azure VMware Solution.
-
-
DHCP (optional) - DHCP ranges for a logical segment. A DHCP server or DHCP relay must be configured to consume DHCP on Segments.
The segment is now visible in the Azure VMware Solution blade, NSX-T Manger, and vCenter

Configure DNS from Azure portal
You’ll configure a DNS forwarder where specific DNS requests get forwarded to a designated DNS server for resolution. A DNS forwarder is associate with a default DNS zone and up to three FQDN zones.
You can also use the NSX-T Manager portal (through the Jumpbox) to configure a DNS forwarder.
To set up a DNS forwarder in the Azure VMware Solution blade in Azure Portal, you’ll:
-
Step 1. Configure a default DNS zone and FQDN zone – When a DNS query is received, a DNS forwarder compares the domain name with the domain names in the FQDN DNS zone.
-
Step 2. Configure DNS service - You’ll configure the DNS forwarder service.
Step 1 - Configure a default DNS zone and FQDN zone
You’ll configure a default DNS zone and FQDN zone to send DNS queries to the upstream server. When a DNS query is received, the DNS forwarder compares the domain name in the query with the FQDN DNS zones’ domain names. If a match is found, the query is forwarded to the DNS servers specified in the FQDN DNS zone. If no match is found, the query is forwarded to the DNS servers specified in the default DNS zone.
A default DNS zone must be defined before you configure an FQDN zone.
-
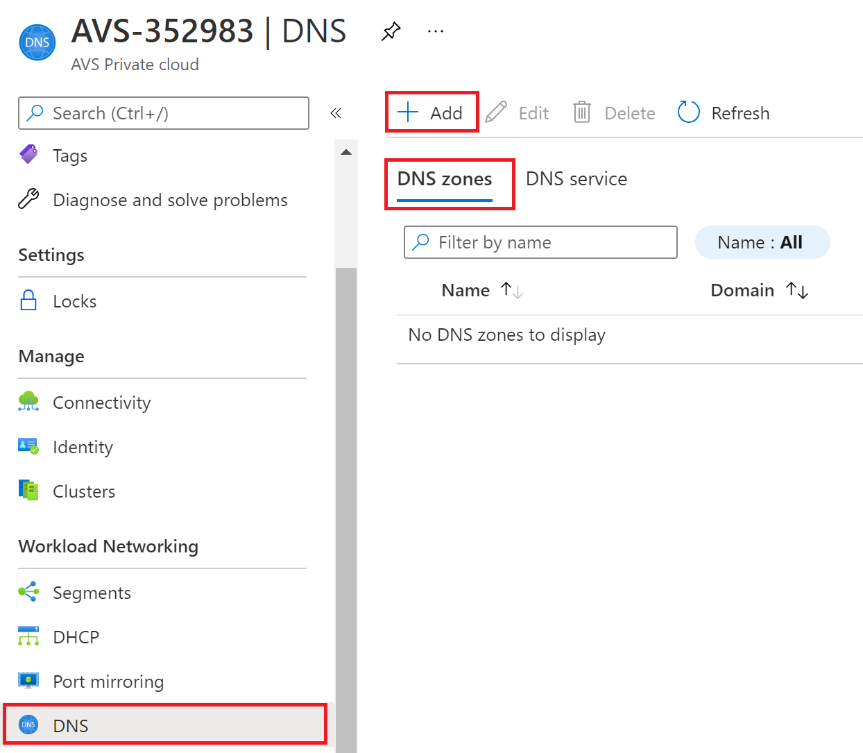
In your Azure VMware Solution Private Cloud, under Workload Networking, select DNS > DNS zones > Add.
-
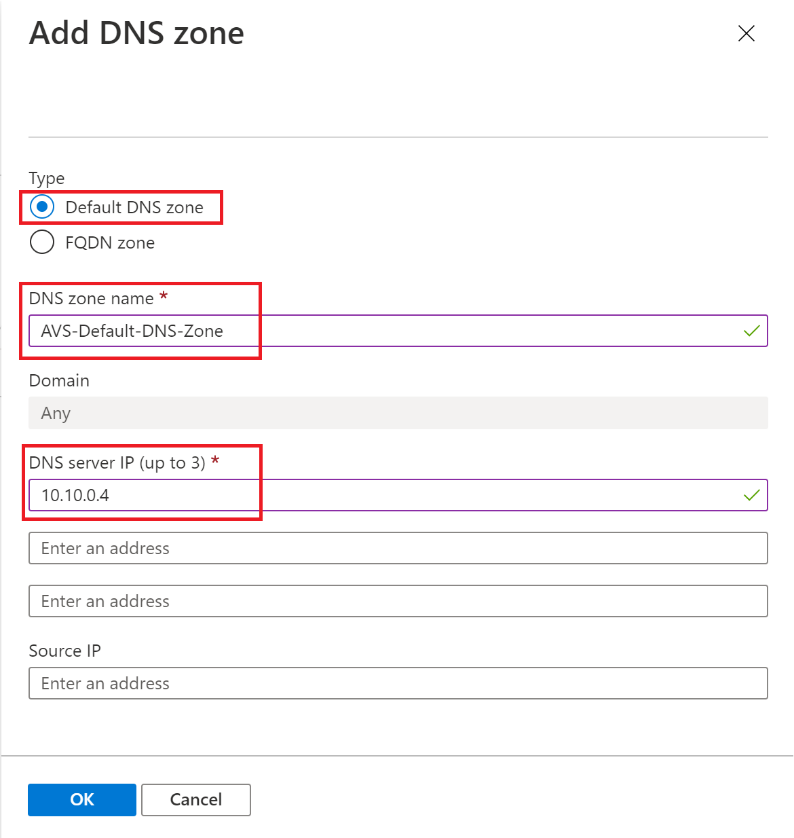
Select Default DNS zone and provide:
-
DNS zone name.
-
DNS server IP, this will be the Jumpbox IP address that you can get from the Azure Portal or from the VM directly once you Bastion/RDP into it. You will be using the Jumpbox as a DNS Forwarder just for the lab purposes, that won’t be practical in production scenarios.
-
-
Click OK, and it will take few seconds to complete.


Step 2 - Configure DNS service
-
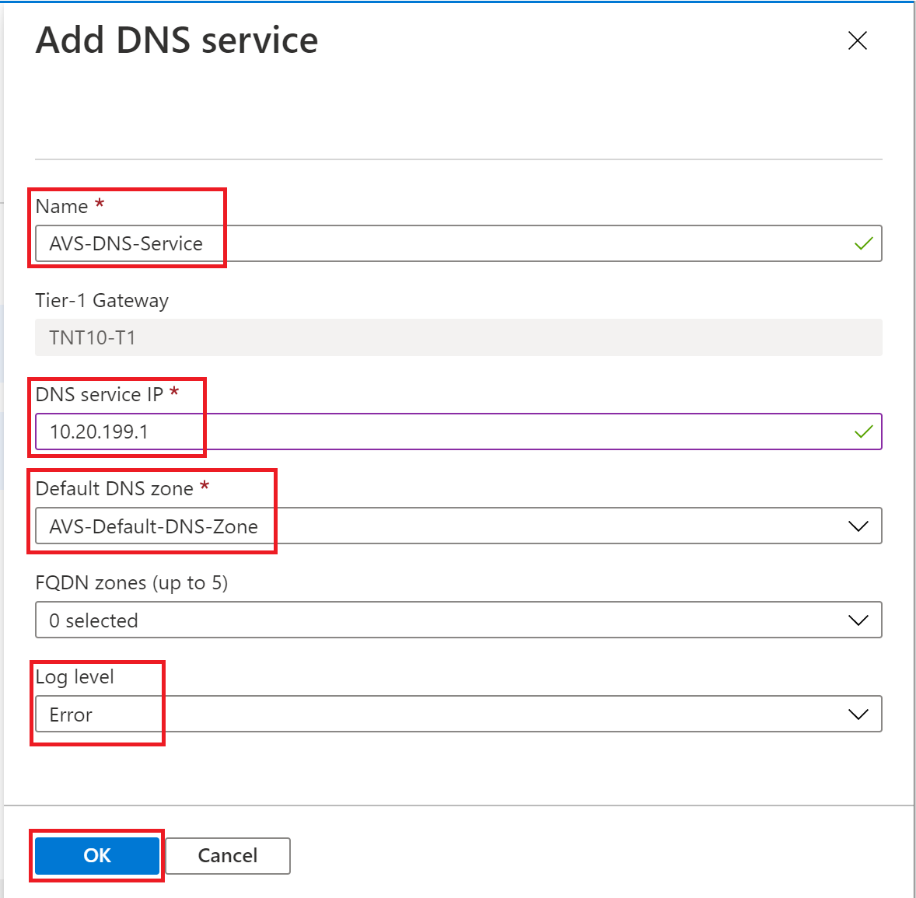
After you created the DNZ Zone, now you will be able to create the DNS Service. Click on the DNS Service tab and click + Add. Fill out the required fields:
-
Name
-
Tier-1 Gateway (A Tier-1 Gateway is selected by default and reflects the gateway created when deploying Azure VMware Solution.)
-
DNS Service IP (that’s what the VMs will use to connect to the DNS Service)
-
Default DNS Zone (that’s the zone you created in the previous step)
-
FQDN zone (you don’t need to specify any for this lab)
-
Log level (Error level is good enough for this lab)
-
-
After few seconds, the DNS Service will be created, and you’ll see a notification saying:

Step 3 - Configure DNS Forwarder
DNS Forwarder is needed to forward DNS queries from VMs hosted in AVS Private Cloud to Azure DNS virtual server (168.63.129.16) to resolve Azure deployed resources through Azure Private DNS Zones. For more details, check this out: What is IP address 168.63.129.16?
-
Connect to the Jumpbox VM that’s hosted on Azure IaaS by leveraging Azure Bastion.
-
Go to DNS MMC Snap-in. You can do that by going to Run tool, and type: dnsmgmt.msc, then click on OK.

-
Expand the DNS root, right click on the DNS Instance, and go to Properties.

-
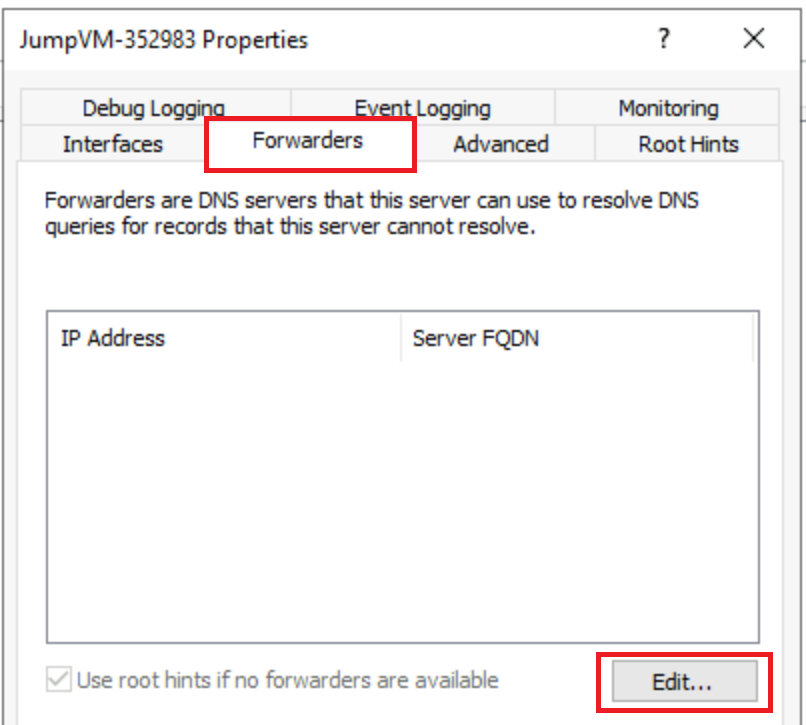
Go to Forwarders tab and click on Edit….
-
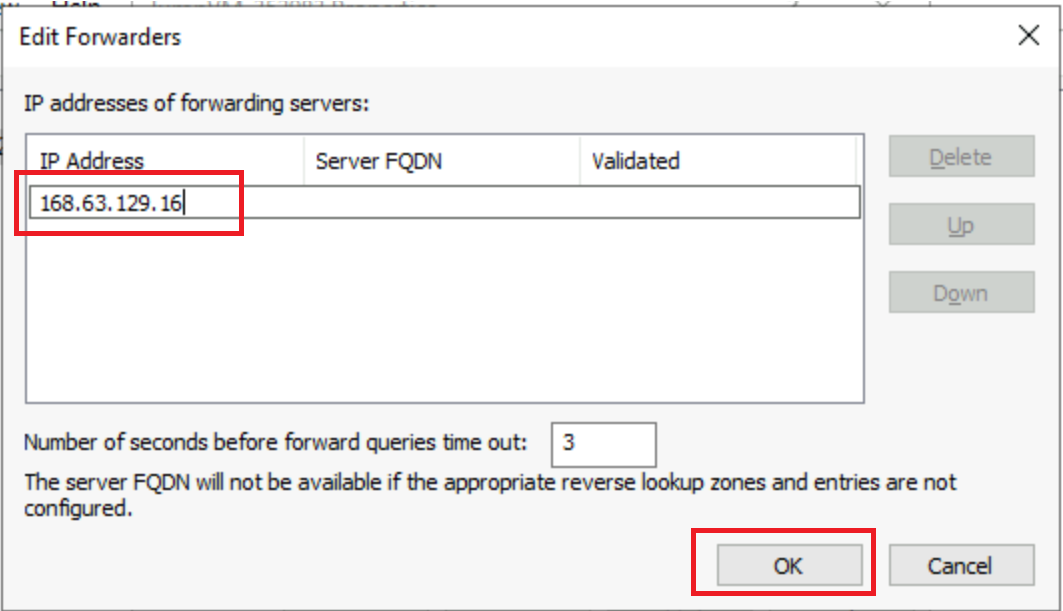
Add this IP address 168.63.129.16, then click OK.
-
Back to the Properties dialog, you can click Apply, then OK to exit. This should be good enough to configure the Jumpbox as a DNS Forwarder.

*You will test the DNS Forwarding functionality in the upcoming labs, once you create a Storage Account that’s associated with Azure Private Endpoint and deploy a VM in AVS Private Cloud. Once we have that setup, you can try to resolve the IP address of the Storage account, and you should get a private IP address not a public one.